Version control is a system that allows developers to track and manage changes to their codebase over time. It helps teams work collaboratively on projects and ensures that everyone is working off of the most up-to-date version of the code. This is especially important for large projects where multiple developers may be working on different parts of the code simultaneously.
There are many different version control systems available, but the most popular is Git. In this post, we’ll be focusing on using Git for version control, including an overview of how it works and how to get started using it.
What is Git and how does it work?
Git is a distributed version control system, which means that it allows developers to work on their own copies of the code and track their changes locally. When they’re ready to share their changes with the rest of the team, they can push their changes to a central repository.
The central repository is typically hosted on a service like GitHub or GitLab, which provides a web-based interface for developers to interact with the repository. This includes features like code review, issue tracking, and project management.
One of the key features of Git is its ability to handle branching and merging. Branching allows developers to create a separate copy of the codebase to work on, without affecting the main codebase. This is useful for working on new features or experimenting with different approaches without affecting the stability of the main codebase.
Merging is the process of taking the changes made in a branch and incorporating them into the main codebase. This is done through a process called a “merge request,” which allows other members of the team to review the changes before they are merged.
Getting started with Git
To start using Git, you’ll need to install it on your computer. You can download the latest version of Git from the official website (https://git-scm.com/). Once you’ve installed Git, you’ll need to set up a few basic configuration options, such as your name and email address.
To set up your name and email address, you can use the following commands:
Once you’ve set up your basic configuration, you’re ready to start using Git. The first thing you’ll need to do is create a repository for your code. A repository is a central location where all of your code and related files are stored.
To create a new repository, you can use the git init command. This will create a new directory called “.git” in your current working directory, which will be used to store all of the metadata and history for your repository.
For example:
$ git init
Once you have a repository set up, you can start tracking changes to your code. To do this, you’ll need to add your files to the repository and commit them.
To add a file to the repository, you can use the git add command. This will tell Git to start tracking the file and include it in the next commit.
For example:
$ git add file.txt
To commit your changes, you’ll need to use the git commit command. This will create a new commit in your repository, which is a snapshot of your code at a particular point in time. When you commit your changes, you’ll also need to provide a commit message, which is a short description of the changes you’ve made.
For example:
$ git commit -m "Added new feature"
Once you’ve committed your changes, you can push them to a central repository. To do this, you’ll need to specify the location of the repository and use the git push command.
For example:
The origin in this example refers to the name of the remote repository, and master refers to the branch you’re pushing to.
Collaborating with Git
One of the key benefits of using Git is the ability to collaborate with other developers. Git makes it easy for multiple developers to work on the same codebase simultaneously, and it provides tools for resolving conflicts and merging changes.
To collaborate with other developers, you’ll need to clone their repository to your local machine. To do this, you can use the git clone command, followed by the URL of the repository you want to clone.
This will create a copy of the repository on your local machine, and you can start making changes to the code. When you’re ready to share your changes with the rest of the team, you can push them to the central repository and create a merge request.
A merge request is a request to merge your changes into the main codebase. It allows other members of the team to review your changes and provide feedback before they are merged.
To create a merge request, you’ll need to push your changes to a separate branch and create a pull request in the web-based interface. This will notify the rest of the team that you have changes ready to be reviewed and merged.
Wrapping it all up
Using version control with Git is an essential tool for any software development team. It allows developers to track and manage changes to their codebase, collaborate with others, and ensure that everyone is working off of the most up-to-date version of the code.
If you’re new to Git, we recommend starting with the basics and gradually learning more advanced features as you become more comfortable with the system. There are many resources available to help you learn Git, including online tutorials, books, and courses. With a little bit of practice, you’ll be a pro at using Git in no time.
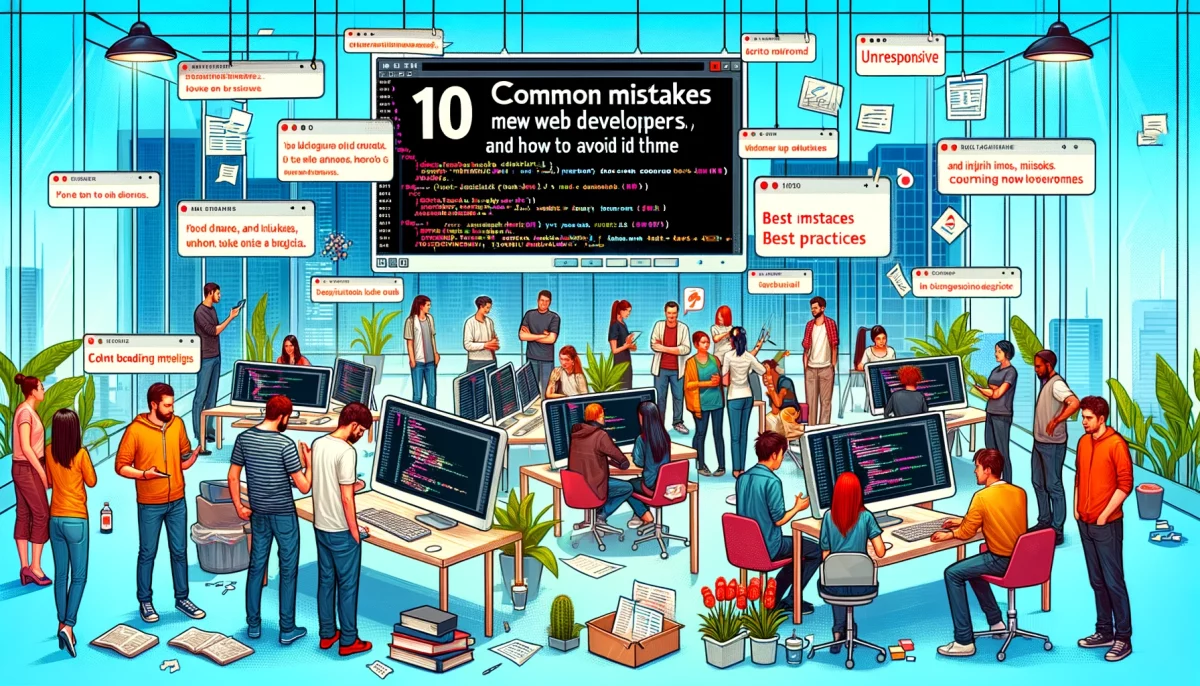
Web development can be a challenging and rewarding field, but it’s easy for beginners to make mistakes that can hinder the success of their projects. In this article, we’ll explore the most common mistakes that people new to web development make, and offer tips on how to avoid them. Whether you’re just starting out as a web developer or have been working in the field for a while, this information is essential for ensuring that your projects are successful and your skills are sharp.
Not planning ahead
One of the biggest mistakes that new web developers make is failing to properly plan their projects. This can lead to a host of problems, including missed deadlines, budget overruns, and poor user experiences.
To avoid these issues, it’s important to start your projects by creating a detailed plan that outlines your goals, budget, timeline, and resources. This will help you stay organized and focused, and ensure that you’re able to complete your projects on time and on budget.
Not testing your code
Testing your code is an essential part of the web development process, but it’s often overlooked by beginners. Failing to test your code can lead to a host of problems, including bugs, security vulnerabilities, and poor user experiences.
To ensure that your code is of high quality, it’s important to test it thoroughly before launching your website or app. This may include manual testing, automated testing, and user testing to ensure that everything is functioning as intended.
Not optimizing for mobile
In today’s digital age, it’s essential that websites and apps are optimized for mobile devices. However, many new web developers overlook this important aspect of development, resulting in poor user experiences for those accessing their sites on smartphones or tablets.
To ensure that your website or app is mobile-friendly, it’s important to test it on a variety of devices and screen sizes. You should also consider using responsive design techniques, which allow your site to automatically adapt to different devices and screen sizes.
Not optimizing for search engines
SEO (search engine optimization) is an essential aspect of web development, as it helps to ensure that your site is visible to search engines like Google. However, many new web developers overlook this important aspect of development, resulting in poor search engine rankings and reduced traffic to their sites.
To optimize your site for search engines, it’s important to conduct keyword research, create high-quality content, and implement technical SEO best practices, such as using header tags and optimizing your site’s loading speed.
Not using version control
Version control is a system that helps to track changes to your code over time, making it easier to collaborate with other developers and revert back to previous versions if necessary. However, many new web developers overlook this important aspect of development, which can lead to a host of problems.
To ensure that you’re able to collaborate effectively with other developers and maintain control over your code, it’s important to use version control systems like Git. These systems allow you to track changes to your code, collaborate with others, and revert back to previous versions if necessary.
Not keeping up with industry trends
Web development is a constantly evolving field, and it’s essential that you stay up-to-date with the latest technologies and best practices. However, many new web developers neglect to keep up with industry trends, which can hinder the success of their projects and limit their career opportunities.
To stay current in the field, it’s important to regularly attend conferences and workshops, read industry blogs and publications, and participate in online communities. This will help you stay up-to-date with the latest technologies and best practices, and ensure that your skills are relevant and in demand.
Not asking for help when needed
Web development can be a complex field, and it’s natural to encounter challenges and roadblocks along the way. However, many new web developers make the mistake of trying to tackle these problems on their own, rather than seeking help when needed.
Asking for help is a critical part of the learning process, and it’s important to remember that there are always people who are willing to lend a hand. Whether it’s reaching out to a colleague, seeking guidance from an experienced mentor, or posting a question on an online forum, don’t be afraid to ask for help when you need it.
Not taking security seriously
Web security is an essential aspect of development, as it helps to protect your site and your users from potential threats like hacking and data breaches. However, many new web developers overlook security, resulting in vulnerabilities that can compromise the safety and integrity of their sites.
To ensure that your site is secure, it’s important to implement best practices like using secure passwords, keeping your software and plugins up-to-date, and using SSL certificates to encrypt data transmitted between your site and your users.
Not considering user experience
The user experience (UX) of a website or app is critical to its success, as it determines how easily and effectively users are able to interact with your site. However, many new web developers overlook UX, resulting in confusing or frustrating user experiences.
To ensure that your site has a positive UX, it’s important to consider the needs and expectations of your users, and design your site accordingly. This may include conducting user research, creating wireframes and prototypes, and testing your site with a variety of users to ensure that it meets their needs.
Not learning from your mistakes
Finally, it’s important to remember that making mistakes is a natural part of the learning process. The key is to learn from your mistakes and use them as opportunities for growth and improvement.
By actively seeking feedback, seeking out new learning opportunities, and reflecting on your experiences, you can continuously improve your skills and avoid making the same mistakes in the future.
Avoiding these common mistakes
Web development can be a challenging field, but by avoiding these common mistakes, you can set yourself up for success. Whether you’re just starting out as a web developer or have been working in the field for a while, it’s important to stay organized, test your code, optimize for mobile and search engines, use version control, stay up-to-date with industry trends, seek help when needed, prioritize security, consider user experience, and learn from your mistakes. By following these tips, you can create high-quality websites and apps that meet the needs of your users and achieve your goals.
In this guide, I’ll show you how to use JavaScript automatically refresh your browser after 30 seconds.
It’s actually pretty easy. So let’s get started.
Open the webpage that you want to refresh in your browser.
Right-click on the webpage and select “Inspect” (or “Inspect Element” depending on your browser). This will open the developer console.
In the developer console, go to the “Console” tab. This is where you can enter and run JavaScript code.
To refresh the page every 30 seconds, use the setIntervalfunction. The setInterval function takes two arguments: a callback function, and the interval time in milliseconds.
setInterval(function() {
  // code to refresh page goes here
}, 30000);
To refresh the page, you can use the location.reload function. This function will reload the current webpage from the server rather than using a cached version.
Press “Enter” to run the code. The page will now refresh every 30 seconds.
If you want to stop the page from refreshing, you can use the clearInterval function. This function takes the interval ID returned by the setInterval function and stops the interval from running.
// stop the interval from running
clearInterval(intervalId);
Keep in mind that constantly refreshing a webpage can put a strain on the server and may not be the best user experience. It’s important to consider if automatic page refresh is necessary and to use it sparingly.
Additionally, the JavaScript code that you enter in the developer console will only run while the console is open. If you close the console, the page will stop refreshing.
As one of the most popular programming languages in the world, JavaScript is an essential skill for any aspiring developer. In this article, we will discuss the most important concepts to master to become proficient in JavaScript.
Variables
Variables are used to store data in a program. In JavaScript, there are several different types of variables, including strings, numbers, and Booleans. It is important to understand how to declare and assign values to variables and use them in expressions and statements.
Data types
In addition to the basic data types mentioned above, JavaScript has more complex data types, such as arrays and objects. Understanding how to work with these data types is crucial for storing and manipulating data in your programs.
Control structures: Control structures are used to control the flow of a program. In JavaScript, the main control structures are if/else statements, for loops, and while loops. It is important to understand how to use these structures to make decisions and repeat actions in your code.
Functions
Functions are blocks of code that can be defined and called upon when needed. In JavaScript, functions can be defined with or without arguments and can return a value if needed. Understanding how to write and use functions is essential for organizing and reusing code in your programs.
Objects
Objects are data structures that store data in a key-value format. In JavaScript, objects can be used to represent real-world entities and can be created using constructor functions or object literals. Understanding how to create and work with objects is important for organizing and accessing data in your programs.
Arrays
Arrays are data structures that store a list of items. In JavaScript, arrays can hold any type of data and can be created using array literals or the Array constructor. Understanding how to create and work with arrays is important for storing and manipulating lists of data in your programs.
DOM manipulation
The DOM, or Document Object Model, is a representation of a web page as a tree of objects. In JavaScript, it is possible to manipulate the DOM by adding, deleting, or modifying elements on a page. Understanding how to manipulate the DOM is essential for building interactive web applications.
Asynchronous programming
Asynchronous programming is a way to execute code in a non-blocking manner. In JavaScript, asynchronous programming is achieved through the use of callback functions, promises, and async/await. Understanding how to use these techniques is important for building responsive and scalable applications.
Error handling
No matter how well you write your code, errors and exceptions are an inevitable part of programming. In JavaScript, it is important to understand how to handle errors and exceptions in order to prevent your program from crashing.
By mastering these concepts, you will have a strong foundation in JavaScript and be well on your way to becoming a proficient developer. As you continue to learn and grow, it is important to stay up-to-date with the latest developments and best practices in the JavaScript community. With dedication and practice, you can become an expert in JavaScript and build powerful and interactive web applications.
LearningJavaScript can seem intimidating, especially if you have no background in programming. But it doesn’t have to be. JavaScript is an incredibly powerful and versatile language that can provide a range of benefits to non-developers. From website development to game design, it can open the door to a world of opportunities and new ideas. Learning JavaScript can even help improve your life in surprising ways, such as enhancing your problem-solving skills and boosting your confidence. Whether you’re a designer, a marketer, an entrepreneur, or just someone who wants to learn something new, JavaScript can provide a range of benefits that can help you take your skills to the next level. So, let’s take a look at the benefits of learning JavaScript for non-developers, and how it can help improve your life.
What is JavaScript?
JavaScript is a programming language that was developed in the 1990s for creating interactive websites. It was designed to run in a browser and to be interpreted by a browser engine. It can be used on both client-side and server-side programming and is commonly embedded into HTML code. JavaScript is a high-level programming language, meaning it is similar to languages like Java and C++. However, it is an interpreted language, which means that it doesn’t need to be compiled into machine code. JavaScript was created by Brendan Eich, who also created Java. JavaScript’s popularity increased dramatically when Tim Berners-Lee released the first version of the World Wide Web. Since then, JavaScript has become a crucial part of the web, and is used for tasks ranging from website development to game design.
Benefits of learning JavaScript for non-developers
While programming is a crucial skill for any developer, learning JavaScript can provide several benefits for non-developers. These include improved problem-solving skills, boosted confidence and creativity, and the opportunity to open the door to new opportunities. If you’re interested in learning JavaScript, but don’t want to become a developer, these benefits can help show you how it can improve your life.
Improved problem-solving skills
Problem-solving is a crucial skill for any type of work, and it can be beneficial to learn new ways to approach problems. While programming is often approached with a structured and logical approach, JavaScript has a more unpredictable nature. This can make it more difficult to predict how the code will behave. However, it can also provide more freedom and flexibility when tackling problems. By having a more open mindset toward problem-solving, you can tackle problems in new ways that allow you to create interesting and unexpected things.
Boosted confidence and creativity
Learning how to create with JavaScript can be a daunting task. But, once you understand the basics and get used to its quirks, you can create some amazing things. Creating interactive and engaging content can be a great way to boost your confidence. It can also help you become more creative as you try to figure out new ways to use JavaScript to develop your ideas. By learning JavaScript, you can open the door to creating new and interesting things that you might not have otherwise been able to create. You can create new interactive content for websites or explore ways to use JavaScript in your creative projects.
Open the door to new opportunities
The best way to learn is to teach, so don’t just learn from others, but also share what you’ve learned with others. By learning JavaScript, you can open the door to new opportunities and share your skills with others. Whether you want to become a teacher or want to improve your chances of getting a job, learning JavaScript can open the door to new opportunities. This can be beneficial in a range of different fields, including marketing, design, and entrepreneurship.
How to learn JavaScript
The best way to learn is to start small. You don’t need to learn everything there is to know about JavaScript; you just need to learn the basics. This will help you get started with the language and give you a basic understanding of how it works. There are a number of different ways you can learn JavaScript, including online courses and tutorials, books, or interactive websites. There are also a range of JavaScript challenges and competitions, where you can apply your skills in fun and interesting ways.
JavaScript learning resources
There are a number of different resources you can use to learn JavaScript. This includes online courses, tutorials, and books. There are also a number of interactive websites where you can apply your skills in a fun and interactive way. You can also find a range of JavaScript challenges and competitions, where you can apply your skills in a fun and competitive way.
Practical applications of JavaScript
JavaScript is a versatile language that can be applied in a range of different industries and situations. This includes website development, where it can be used for tasks such as manipulating images and creating animations. JavaScript can also be used for data visualization and mapping, as well as scientific and mathematical functions. JavaScript can also be applied in marketing, where it can be used for tasks such as website analytics and email marketing. It can also be applied in design, where it can be used for tasks such as 3D modeling and creating interactive visuals. JavaScript is also becoming increasingly popular in education. It can be used for tasks such as creating immersive and engaging content, and exploring concepts in a new and exciting way.
Examples of successful JavaScript projects
As we’ve discussed, JavaScript can be applied in a range of different industries and situations. This includes creating new and innovative educational content, improving website analytics and design, and creating new and exciting ways to explore concepts. Let’s take a look at a few examples of successful JavaScript projects: – Virtual Reality – Virtual reality has become increasingly popular in recent years. It’s used in a variety of scenario, ranging from gaming to education. To create virtual reality experiences, developers use JavaScript for real-time 3D rendering, interacting with sensors, and designing virtual environments. – Education – Education is becoming more and more immersive and interactive. This is particularly true when it comes to online learning. This can be a great way to engage students and provide a new and exciting experience. One example of how JavaScript is being used in education is in Virtual Human Interaction Lab (VHIL). VHIL uses a combination of virtual reality and motion-capture technology to allow students to engage with avatars of real people. – Improved website analytics – One of the most important aspects of running a website is understanding its users. This can be difficult if you’re not a developer. However, JavaScript can be used to create new and innovative ways of understanding website visitors. One example of this is Hotjar. Hotjar is a tool that uses website analytics to provide insights into user behavior. It provides information such as where users are clicking, their journey through the website, and their device type. It also provides information about where users are coming from, and what they are doing once they leave the website.
Examples of successful non-developers using JavaScript
JavaScript is a powerful language that can be applied in a wide range of industries. This includes marketing, education, and design. It can also be used to create new and innovative ways to explore concepts. These are just a few examples of how non-developers can use JavaScript to create new and engaging content. Let’s take a look at a few examples of successful non-developers who have used JavaScript: – Marketing – When marketing your products or services, it’s important to use different and innovative methods. This can help you stand out and engage with your audience in new ways. One example of how JavaScript is being used in marketing is with interactive infographics. These are visual representations of information that are usually designed using online tools. They’re a great way to convey information quickly and effectively. – Design – Design is becoming increasingly digital. This means that designers can use a variety of new tools and methods to create new and exciting designs. One example of how JavaScript is being used in design is with 3D modeling. This is a highly creative process that can be used to create a range of design elements. A popular example of this is designing logos and other branding elements using software like Sketch or Autodesk.
Conclusion
Learning JavaScript can be a daunting task for anyone, but it can be particularly challenging for non-developers. However, it is a worthwhile investment and can open the door to a range of different opportunities. It can also help improve your life.
Good JavaScript programming needs a process — a way to guide how you think about problems and how you write code to solve these problems.
Arbitrarily inventing and improvising your code’s structure is fine for a beginner, but any technical recruiter administering a JavaScript proficiency test will always consider this amateurish at best.
In JavaScript, one of the best programming paradigms is the object-oriented paradigm.
It’s a set of principles that guide the logic of your code structure and how you should write your JavaScript.
And while it has technical aspects, it is not solely a technical component of JavaScript, as a function or loop is. It’s also a way of thinking about problems and a set of rules about how to write your code to solve these problems.
In its simplest interpretation, it’s nothing more than a way to structure your code.
In its most complex, it’s a set of methodologies to guide how you think about and solve problems with your JavaScript code.
This guide will help you understand and apply the object-oriented programming paradigm.
Object-oriented programming
Object-oriented programming relies heavily on objects and is based on four scary-sounding principles:
encapsulation
abstraction
inheritance
polymorphism
Each principle is applied through JavaScript objects, meaning you’ll be using objects to structure and organize your program.
You’ll still use functions and loops and all your favorite JavaScript methods, but they will all be organized within and around the capabilities of objects.
Let’s explore these principles to help you understand what they mean.
Encapsulation
Or, in simpler terms — keep related parts of your code grouped together.
Your JavaScript programs will always have portions of code that are directly related to each other.
The principle of encapsulation dictates that when you have code that can be grouped together, you group it together.
Take a look at the code below, do you see any groups that the statements can be organized into?
let dogBreed = "Golden Retriever"
let dogColour = "Yellow";
let dogAge = 2;
let dogSound = function() {
alert("Woof Woof!");
};
let catBreed = "Tabby";
let catColour = "Grey";
let catAge = 3;
let catSound = function() {
alert("Meooooow!");
}
Right, the two categories are fairly obvious: dog and cat.
Following the principle of encapsulation, let’s reorganize our code with the use of JavaScript objects.
Here’s what that looks like:
let dog = {
  breed: "Golden Retriever",
  colour: "Yellow",
  age: 2,
  sound: function () {
    alert("Woof Woof!");
  },
};

let cat = {
  breed: "Tabby",
  colour: "Grey",
  age: 3,
  sound: function () {
    alert("Meooooow!");
  },
};
That’s really it, to apply this principle you just need to make sure that when you have code that can be grouped together, you group it together.
And with the use of the encapsulation principle, we can ensure that data and methods are all grouped together, thereby making your code easier to understand and maintain.
Abstraction
Or, in simpler terms — keep the JavaScript objects you create simple.
Objects have a tendency to become unnecessarily complex as they are versatile and have no limit to the number of methods or properties they can contain.
The principle of abstraction encourages you to keep your object simple by only using the methods and properties which are essential to the object to perform it’s desired output.
Let’s consider a TV through the lens of abstraction to arrive at a better understanding of the concept.
A TV does many things, it can turn on, turn off and switch to specific channels, and you can even cast content to it from your phone.
A TV also has many properties: weight, size, colour, age, and brand.
Through the lens of abstraction, if we were to create a JavaScript object to allow the TV to turn on, that object should only contain the properties and methods directly related to making the TV turn on, everything else is irrelevant.
In other words, the object is an abstraction of the TV as a whole. It is a simplified version of a TV as it does not contain all the properties and capabilities of a TV, but only what is necessary to allow the TV to turn on.
Let’s write some code to demonstrate how abstraction works for this TV object designed to turn the TV on.
Here’s what the object might look like without abstraction.
Notice how the second version only contains what is necessary to allow the TV to turn on?
That’s the essence of abstraction. Only put in your objects what is necessary.
Inheritance
Or, in simpler terms — reduce repetition.
When using objects in JavaScript we often end up with a lot of very similar objects. Many times you’ll need an object to have the same method or property as an existing object.
Object-oriented programming seeks to minimize the confusion that similar objects have through inheritance.
This is a bit of a tricky concept, so let’s use an analogy of a library.
Think of a library with thousands of books. While each of these books may be unique, they are all still books, and books can all be read.
Thinking of this through the principle of abstraction and objects, we’d want to have a single instance of the read method that is shared (inherited) by all books.
We can do this with the use of a JavaScript prototype.
A prototype allows you to create objects that are based on a single, master object. In JavaScript, this process is called instantiation.
For books, we’d want our prototype to contain a read function so that any time a new book object is instantiated from it, it contains the same read method, saving us from having to recreate the same read method for every book.
Let’s use some code to help illustrate the concept of inheritance and prototypes in action.
First, let’s create a prototype for the book.
function Book(title, author, year, category) {
  this.title = title;
  this.author = author;
  this.date = year;
  this.category = category;
  this.read = read() {
  console.log("You are reading this book!");
  }
}
Next, let’s instantiate a new object based on the prototype.
function Book(title, author, year, category) {
  this.title = title;
  this.author = author;
  this.date = year;
  this.category = category;
  this.read = function() {
  	console.log("You are reading this book!");
  }
}

let book1 = new Book("Dune", "Frank Herbert", 1965, "science fiction");
Now that you’ve instantiated a new object from the prototype, try calling the function from the Book prototype with the book1 object in your JavaScript console.
Notice how the book1 object has the read method even though it wasn’t specified when you were creating it?
The book1 object has the read method because it inherited it from the Book prototype.
With the use of the inheritance principle, we can ensure that data and features used by multiple objects are contained in a single source, thereby reducing the need for repetition and making your code easier to maintain.
Polymorphism
Or, in simpler terms — your JavaScript statements can have varied outputs.
The concept of polymorphism is the trickiest of the four principles for me. It took me quite some time to wrap my head around the concept and how to apply it, but I think the explanation that follows will help you avoid some of the headaches I experienced.
The word polymorphism is ancient Greek and translates roughly to many kinds. In JavaScript, this means a statement can have many varied outputs.
Think of the prototype concept we just explored in the previous section which can pass on a method or property to an instantiation.
Polymorphism allows each instantiation to produce its own unique output when using a method or property inherited from a prototype.
Let’s look at an example using animal sounds to better understand how polymorphism works.
First, let’s create an Animal prototype that receives a parameter for the sound an animal makes.
Next, let’s instantiate three objects from the Animal prototype and give them each a unique sound.
function Animal(sound){
    this.sound = sound;
    this.speak = function(){
        return this.sound;
}
}
var dog = new Animal("woof");
var cat = new Animal("meow");
var cow = new Animal("moo");
Next, let’s create a function to display each of the sounds in the console.
function Animal(sound){
    this.sound = sound;
    this.speak = function(){
        return this.sound;
}
}
    var dog = new Animal("woof");
    var cat = new Animal("meow");
    var cow = new Animal("moo");
function showInfo(obj){
console.log(obj.speak());
}
And finally, let’s log each of the sounds to the console.
function Animal(sound){
    this.sound = sound;
    this.speak = function(){
        return this.sound;
}
}
    var dog = new Animal("woof");
    var cat = new Animal("meow");
    var cow = new Animal("moo");

function showInfo(obj){
    console.log(obj.speak());
}
showInfo(dog);
showInfo(cat);
showInfo(cow);
Notice how each instantiation of the Animal object passes its own unique argument to the same speak method and a single speak method has three different outputs? This is polymorphism.
Within the Animal prototype there is a single method speak. Within each instantiation of this prototype (dog, cat and cow) the method expresses different outputs.
So, to reiterate, your JavaScript statements can have varied outputs. This is polymorphism.
Applying the principle of polymorphism allows you to keep your code organized and efficient by minimizing the need for repetition.
Applying Object-oriented programming methodology to your problem solving
To use the object-oriented programming methodology effectively you must teach yourself how to look at problems through an object-oriented lens.
Now that we’ve covered the four principles of object-oriented programming: encapsulation, abstraction, inheritance, and polymorphisms, I want to share my approach to looking at problems through an object-oriented lens.
But first, I want to acknowledge that there are many articles expressing countless views on how you can, should, and should not think about programming in JavaScript.
I suspect that over time JavaScript developers each develop a unique approach to writing JavaScript and that every one of them will profess to you that their approach is the best.
I’m not going to argue that my approach is the best, but simply that it works for me.
My approach is simple and relies on following the steps:
Deconstructing each part of your problem.
Encapsulating each part into an object.
Ensuring each object is an abstraction and contains only what is necessary to arrive at the desired output.
Applying Inheritance and polymorphism to reduce complexity.
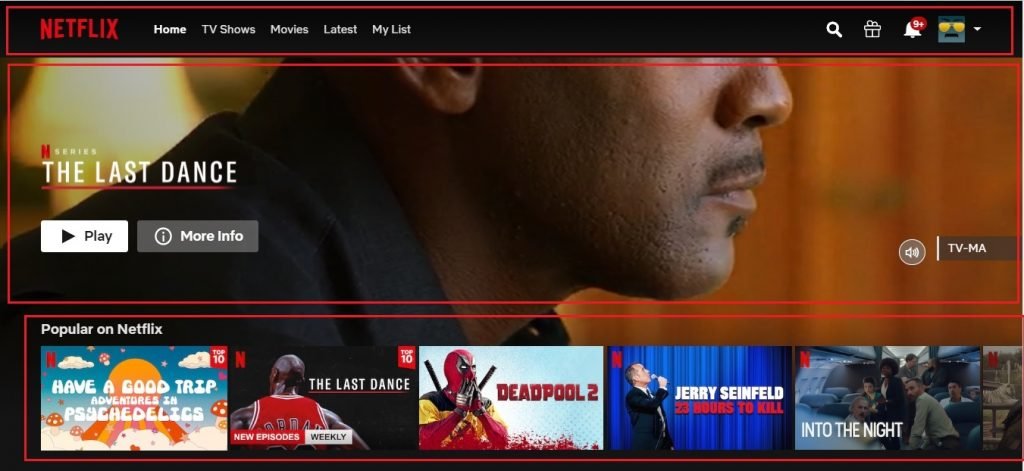
Let’s take a try using the four steps above on this Netflix homepage.
First, let’s deconstruct the parts of the homepage.
I see three main parts: the navigation, the hero image, and the “Popular on Netflix” slider.
Now that we’ve deconstructed the page, let’s create an object for each component.
let navBar = {};
let heroImage = {};
let popSlider = {};
Now, let’s use abstraction to add properties and methods to the navBar and heroImage objects.
let navBar = {
  logo: "netflix-logo.jpg",
  homeBtn: "netflix.com",
  tvBtn: "netflix.com/tv",
  moviesBtn: "netflix.com/movies",
  latesBtn: "netflix.com/latest",
  myListBtn: "netflix.com/list"
};

let heroImage = {
	mainImage: "theLastDance.jpg"
  	playBtn: function() {
    console.log("starting your show");
    },
    moreInfoBtn: function() {
    console.log("here's more info");
    }
};

let popSlider = {

};
Seeing as the popSlider object has a number of movies, we’ll use the principle of inheritance and create a prototype to avoid repetition.
Now let’s instantiate some objects from the popSlider prototype.
let navBar = {
  logo: "netflix-logo.jpg",
  homeBtn: "netflix.com",
  tvBtn: "netflix.com/tv",
  moviesBtn: "netflix.com/movies",
  latesBtn: "netflix.com/latest",
  myListBtn: "netflix.com/list"
};

let heroImage = {
	mainImage: "theLastDance.jpg",
  	playBtn: function() {
    console.log("starting your show");
    },
    moreInfoBtn: function() {
    console.log("here's more info");
    }
};

function popSlider(title, year, category) {
  this.title = title;
  this.date = year;
  this.category = category;
  this.movie = function() {
  	console.log(this.title);
  }
}
let pop1 = new popSlider("Have a Good Trip", 2020, "documentary");
let pop2 = new popSlider("The Last Dance", 2020, "documentary");
let pop3 = new popSlider("Deadpool 2", 2019, "action");
let pop4 = new popSlider("Jerry Seinfeld", 2018, "comedy");
let pop5 = new popSlider("Into the Night", 2017, "suspense");
Finally, let’s use the principle of polymorphism to use our inherited movie method to list the title of each of our popSlider instantiations.
let navBar = {
  logo: "netflix-logo.jpg",
  homeBtn: "netflix.com",
  tvBtn: "netflix.com/tv",
  moviesBtn: "netflix.com/movies",
  latesBtn: "netflix.com/latest",
  myListBtn: "netflix.com/list"
};

let heroImage = {
	mainImage: "theLastDance.jpg",
  	playBtn: function() {
    console.log("starting your show");
    },
    moreInfoBtn: function() {
    console.log("here's more info");
    }
};

function popSlider(title, year, category) {
  this.title = title;
  this.date = year;
  this.category = category;
  this.movie = function() {
  	console.log(this.title);
  }
}
let pop1 = new popSlider("Have a Good Trip", 2020, "documentary");
let pop2 = new popSlider("The Last Dance", 2020, "documentary");
let pop3 = new popSlider("Deadpool 2", 2019, "action");
let pop4 = new popSlider("Jerry Seinfeld", 2018, "comedy");
let pop5 = new popSlider("Into the Night", 2017, "suspense");
function showInfo(obj){
console.log(obj.movie());
}
showInfo(pop1);
showInfo(pop2);
showInfo(pop3);
showInfo(pop4);
showInfo(pop5);
And there you have it, you’ve now got a working understanding of object-oriented programming and are well on your way to becoming an intermediate JavaScript developer.
This is one of the most challenging topics for beginners, so congratulations on making it this far.
Objects are one of the most elegant, simple and extraordinarily useful tools you’ll ever work with when programming in JavaScript.
In fact, objects are one of the reasons why JavaScript is such a popular and widespread programming language.
And if you want to improve your JavaScript programming from beginner to intermediate, you’ll need to understand JavaScript objects.
In fact, without understanding JavaScript objects, you’ll never really understand JavaScript, as almost everything in JavaScript is an object.
This guide will help you understand objects in the JavaScript language. Specifically, it will help you understand object syntax and how to write and use the objects you create.
What are JavaScript objects
The easiest way to think of a JavaScript object is as a container that holds related variables and functions. Sort of like a storage container.
Imagine you have a container and you fill it with sewing items.
You could label this container “sewing supplies” and fill it with thread, needles, pins, and other sewing related items.
This sewing supplies container helps keep your sewing supplies organized and easy to find.
A JavaScript object does the same thing. It helps you keep your data organized and easy to find, and things that help keep your data organized and easy to find are often referred to as data structures.
Actually, you may already be familiar with data structures if you read my beginner’s guide to arrays.
Either way, if it helps you keep your data organized, it’s a data structure, and objects are some of the most useful and simple data structures.
In fact, a JavaScript object is really nothing more than a collection of related name-value pairs, and name-value pairs really only consist of two things: a data value and the name that is used to identify that data value.
In other words, a JavaScript object is not only a collection of name-value pairs, but the object itself is like a container you can use to group the name-value pairs. Just like the sewing supplies container.
Here’s another example to demonstrate how a JavaScript object is like a container.
Let’s imagine we wanted to group together a set of attributes for someone named Steve.
In this example, Steve would be the object and the name/value pairs would be the properties of Steve.
Here’s what this looks like:
let steve = {
 height: 190,
 weight: 185,
 hairColour: black,
 alias: "Smiley",
 sayHelloSteve: function() {
 alert("Hello Steve!");
 }
}
};
Simple right? All of the name-value pairs: height: 190, weight: 185, hairColour: black and sayHelloSteve: function() {alert("Hello Steve!"); all fit nicely under the category Steve, which is the object name: steve.
Also, notice how much easier it is to understand that the name-value pairs are all associated with the object steve?
This is a huge help when working on enormous projects with thousands of lines of code.
Now let’s take a look at JavaScript object syntax.
JavaScript object properties, methods and syntax
As mentioned, a JavaScript object is a collection of name-value pairs.
In JavaScript, object name-value pairs have two types: properties and methods.
Let’s take a look at both object properties and methods and then deconstruct a JavaScript object to understand its syntax further.
Object properties
Object properties are any variable declarations within the object that are not functions.
Here’s what this looks like using a car as an example:
Each variable declaration contained within the opening { and closing } of the myCar object: brand: "Subaru"colour: "Blue" and year: 2019 are all properties of the myCar object.
All of these variables declarations are not function declarations and so they are properties of the object.
Object methods
Object methods are function declarations within the object.
Let’s continue with the car example, but this time we’ll create two methods instead of properties for the myCar object.
Here’s what this looks like:
let myCar = {
	carStart: function() {
    alert("Engine is on");
    },
  	carShutdown: function() {
    alert("Engine is off");
    }
}
Each function declaration contained within the opening { and closing } of the myCar object: carStart: function() {alert("Engine is on");} and carShutdown: funtion() {alert("Engine is off");} are all methods of the myCar object.
All of these declarations are function declarations and so they are methods of the object.
To reiterate: any variables contained within the object that are not functions are called properties, while any functions declared within the object are called methods.
Now let’s deconstruct a JavaScript object with both properties and methods to get a better understanding of how objects work.
Object syntax
An empty object in JavaScript is created with the following:
let myNewObject = {};
let myNewObject =asssigns the variable named myNewObject to the object specified by the opening { and closing }.
In JavaScript, an object is created and its contents are defined within the opening { and closing }.
In the example above, however, the object is empty.
Let’s explore the syntax further by deconstructing an object which has content within the opening { and closing } and combines the properties and methods from the car examples from the previous section.
Here’s what that looks like:
let myCar = {
	brand: "Subaru",
  	colour: "Blue",
  	year: 2019,
  	carStart: function() {
    	alert("Engine is on");
    },
  	carShutdown: function() {
    	alert("Engine is off");
    }
};
Ok, the first part you should be familiar with already.
let myCar = asssigns the variable named myCar to an object.
The first statement within the object opening { and closing } is brand: "Subaru". This is a property statement, one of the two types of name-value pairs allowed by JavaScript objects: properties and methods.
brand: "Subaru", is a property of the myCar object. The property name is brand, the value is "Subaru", and a colon : is used to assign the property name to the value.
You indicate that there’s another statement in the object with a ,.
As you can see, there’s another property after brand: "Subaru" which is colour: "Blue". So to indicate there’s another property statement in the object you’d write a , after brand: "Subaru".
Following the property statement colour: "Blue" is another property statement year: 2019.
Each statement in an object must end with a comma , if there is a statement following it.
If it’s the last statement in the object then it does not require a ,.
Following the last property statement year: 2019 you’ll see the other type of statement for a JavaScript object, a method statement, which contains a function.
The first method statement of the myCar object is carStart: function() { alert("Engine is on"); }.
The method statement name is carStart and is assigned to the value with a :. The actual function value which follows is the same syntax as a regular JavaScript function: function() { alert("Engine is on"); }.
And, as we mentioned previously, each statement unless it’s the last statement, ends with a ,.
The final statement in the myCar object is another method statement: carShutdown: funtion() { alert("Engine is off"); }.
Since this is the final statement in the myCar object, there’s no need for a final ,.
Okay, so that covers object properties, methods and syntax.
Now let’s take a look at how you call and reference objects and their properties and methods.
Calling properties and methods of a JavaScript object
Accessing information within a JavaScript object is straightforward.
You can access the properties and methods within an object by calling the object name followed by a . and then the name of the property or method you’d like to access.
Let’s imagine we wanted to access the year property of the myCar object below:
let myCar = {
	brand: "Subaru",
  	colour: "Blue",
  	year: 2019,
  	carStart: function() {
    	alert("Engine is on");
    },
  	carShutdown: function() {
    	alert("Engine is off");
    }
};
If you wanted to access or reference the year property of the myCar object you’d use: myCar.year.
If you wanted to access or reference the carShutdown method of the myCar object you’d use myCar.carShutdown().
If you wanted to list all the properties and methods available to an object you’d simply type the object name in your JavaScript developer console.
In this example that would be myCar.
Ok, pretty handy right?
I think so!
Hopefully, you now have a better grasp on JavaScript objects, their syntax, and how to write and use the objects you create.
One of the most incredible powers you can give to your JavaScript program is the ability to make decisions on its own.
Whether you want your program to decide the best time to ask a visitor to subscribe to your newsletter or display your site content in a different language, conditional statements will allow your JavaScript program to make decisions based on conditions and then act on them.
In a way, conditional statements give intelligence to your programs. And this adds a powerful layer of sophistication to any JavaScript program.
This guide will help you understand conditional statements in the JavaScript language. Specifically, it will help you understand conditional statement syntax and how to write and use conditional statements.
What is a JavaScript conditional statement?
A conditional statement tells JavaScript how it should behave when a certain condition is met.
For example, if a user visits your website and their preferred language is French, you could use a JavaScript conditional statement to determine the user’s preferred language is French, and then display the content of your website in French to them.
The best part? You aren’t limited to a single condition, you can repeat this approach for any number of conditions — if the user prefers German, display the page in German, if they prefer Russian, display it in Russian.
An interesting thing about conditional statements is how simple they are. A conditional statement really has only two parts:
the condition
the action to perform once the condition is met
In the language examples above, the condition would be the user’s language preference, and the action to perform would be to display the content in the preferred language.
Another way to think of a conditional statement is to compare it to how you’d make a decision about what time you’ll wake up.
Let’s imagine you had a job that required you to arrive at work by 9 a.m. from Monday to Friday.
Let’s also imagine that you needed to wake up two hours before 9 a.m to arrive to work on time.
The conditions in this example would be pretty simple:
If it’s Monday, Tuesday, Wednesday, Thursday or Friday, you’ll need to wake up at 7 a.m., otherwise, you can wake up any time you’d like.
Let’s take a look at JavaScript conditional statement structure and syntax to get a better grip on how it works.
JavaScript conditional statement structure and syntax
Conditional statements in JavaScript rely on a set of three basic syntax keywords: if, else and else if.
Here’s what this looks like:
if (condition === true) {
  //execute this code
}
else if (alternative condition === true) {
  //execute this code
}
else {
  //execute this code
}
Let’s break down what’s actually going on here:
You specify a condition to match within the opening ( and closing ) with the keyword if.
JavaScript checks if the condition is matched.
If the condition is matched, JavaScript identifies the condition as true.
JavaScript then executes the code within the opening { and closing } associated with the condition which is true.
If the condition is not matched, JavaScript identifies the condition as false.
JavaScript skips the code associated with the condition which returned false and proceeds to check if the condition within the next else if statement is true.
If the condition is matched, JavaScript identifies the condition as true and executes the code within the associated opening { and closing }.
If the condition is not matched, JavaScript identifies the condition as false.
The process above is repeated until each condition is checked.
If none of the conditions return true then the final else statement will run.
Once a condition is matched as true the conditional statement stops running. Only if the condition is false will JavaScript proceed to the next condition.
Let’s dissect the syntax.
The if keyword tells JavaScript which condition it should listen for.
The content within the opening ( and closing ) is the specific condition that must be matched. They will return as either true if matched and false if not matched.
The code between the opening { and closing } will run if the preceding condition is true.
The else if keyword tells JavaScript what to do when the previous condition is false, and the associated opening { and closing } is the code JavaScript will then execute.
The else keyword tells JavaScript what to do when none of the previous conditions are true. The code within the associated opening { and closing } is the code JavaScript will then execute.
Let’s take a look at another example using our alarm clock where the if condition is Monday, Tuesday, Wednesday, Thursday or Friday.
Here’s what this looks like:
if (Monday, Tuesday, Wednesday, Thursay or Friday === true) {
  //execute this code
  console.log("Time to wake up!");
}
else {
  //execute this code
  console.log("It's ok, you can sleep in");
}
To reiterate, when it is Monday, Tuesday, Wednesday, Thursday or Friday, the if condition will return as true.
When the if condition is true JavaScript will execute the code within the associated opening { and closing }. In the code example above, this is console.log("Time to wake up!");
Otherwise, if the condition is false, and it is not Monday, Tuesday, Wednesday, Thursday or Friday, JavaScript will skip the associated code within the opening { and closing } and instead execute the code within the opening { and closing } which follows the else keyword.
Additionally, as mentioned, you are not limited to two conditions, you can add as many conditions as you’d like with else if.
Here’s what this looks like:
if (Monday === true) {
  //execute this code
  console.log("It's Monday, time to wake up!");
}
else if (Tuesday === true) {
  //execute this code
  console.log("It's Tuesday, time to wake up!");
}
else if (Wednesday === true) {
  //execute this code
  console.log("It's Wednesday, time to wake up!");
}
else if (Thursday === true){
  //execute this code
  console.log("It's Thursday, time to wake up!");
}
else if (Friday === true){
  //execute this code
  console.log("It's Friday, time to wake up!");
}
else {
  //execute this code
  console.log("It's ok, you can sleep in");
}
Clear as mud?
Don’t worry, let’s practice by building a working alarm clock, it’s the perfect way to get a real understanding of conditional statements.
Writing a program with JavaScript conditional statements
Let’s start by creating a few variables in your JavaScript developer console to get the current day of the week.
var currentDate = new Date();
var dayOfWeek = currentDate.getDay();
The variable currentDate uses the new Date() constructor to tell your web browser what date it is.
The variable dayOfWeek then applies the getDay() method to currentDate and returns an integer corresponding to the day of the week: 0 for Sunday, 1 for Monday, 2 for Tuesday, 3 for Wednesday, 4 for Thursday, 5 for Friday and 6 for Saturday.
Let’s add a conditional statement to alert us if it’s a day of the week.
var currentDate = new Date();
var dayOfWeek = currentDate.getDay();

if (dayOfWeek === 0 || 1 || 2 || 3 || 4 || 5 || 6 ) {
  alert("It's a weekday, make sure you are awake by 7 a.m.");
}
Notice the use of ||, called an OR logical operator, within the opening ( and closing )?
This tells JavaScript that it can match 0 or 1 or 2 or 3 or 4 or 5 or 6.
They are really useful and allow you to specify multiple conditions for a single set of actions. In the example above, it allows us to specify each day of the week.
Ok, now let’s add an else keyword to our code to tell JavaScript what to do when it’s a weekend and the conditions above are not met.
var currentDate = new Date();
var dayOfWeek = currentDate.getDay();

if (dayOfWeek === 0 || 1 || 2 || 3 || 4 || 5 || 6 ) {
  alert("It's a weekday, make sure you are awake by 7 a.m.");
}
else {
alert("Relax, you can sleep in, it's the weekend!");
}
Now, let’s make this a bit more robust, let’s add an additional condition for Wednesday, when you work from home, with the use of else if keyword.
We’ll need to remove Wednesday from our first if condition and then add it to a newly created else if condition.
var currentDate = new Date();
var dayOfWeek = currentDate.getDay();

if (dayOfWeek === 0 || 1 || 2 || 4 || 5 || 6 ) {
  alert("It's a weekday, make sure you are awake by 7 a.m.");
}
else if (dayOfWeek === 3) {
alert("You work from home today, you can wake up a bit later at 8 a.m.");
}
else {
alert("Relax, you can sleep in, it's the weekend!");
}
And voila, you now have a working alarm clock in your JavaScript console that knows the difference between weekdays, weekends, and when you work from home.
Pretty neat right?
Hopefully, now you understand why conditional statements give intelligence to your programs. And how this adds a powerful layer of sophistication to your JavaScript program.
Next up, let’s take a look at JavaScript objects, the most powerful concept in JavaScript programming.
Have you ever wanted, or needed, to collect all of the email addresses or links on a website?
Have you ever tried to do this manually?
I have. It’s incredibly tedious.
There’s nothing quite as dehumanizing as robotically copying and pasting hundreds of email addresses or links from a webpage to an excel sheet over and over again.
So let’s make sure you never have to do that again.
In this guide, I’ll show you how to use JavaScript to collect all of the email addresses or links on a webpage.
It’s actually pretty easy. So let’s get started.
Thinking before writing your code
Before we begin writing our program, it’s always useful to think about what we’re trying to accomplish; this helps us write a more coherent program.
Here’s what we know we’ll need to do for this program:
Search through the content of the webpage for emails/links.
Collect the email/links.
Seems pretty straightforward, right? It is!
Now let’s break down each of the steps above into actual statements that we’ll need to write to complete the task of collecting emails from a website.
Here’s what we need to do:
Create an empty array to populate with email/links.
Specify where in the DOM we want JavaScript to search.
Convert the content of the DOM to a string.
Use the .match method to specify what we’re searching for.
Add the matched items to our array.
Also pretty straightforward, so let’s start writing some code.
I created a test page for you to practice with. Please open this page in a new window beside this one, activate your developer console, and follow the instructions below.
Collecting all the email addresses on a webpage
Once you’ve opened up this page and started your JavaScript developer console, you’ll need to create an empty array to store the email addresses.
Please type this into your JavaScript developer console:
var listOfEmails = [];
Great, now let’s determine where we want JavaScript to look for these email addresses.
In the test page, I created for you, the email addresses are within the opening <body> and closing </body>HTML tags of the page.
Let’s write a variable and assign the content within these tags to it:
var contentToSearch = document.body.innerHTML;
Now let’s verify the content assigned to our variable is correct by typing the following in our JavaScript developer console:
contentToSearch;
Did you see the HTML content of the page appear in your developer console? Excellent.
Now we need to convert the content from HTML to text so we can search it. To do this we’ll use the .toString method and apply it to our contentToSearch variable, which will convert all the HTML to text:
var contentAsText = contentToSearch.toString();
All of the content within the opening <body> and closing </body> HTML tags have just been converted to text and assigned to the variable contentAsText.
Let’s now search through it for the email addresses.
To do this we’ll use the .match method on the variable contentAsText in conjunction with a regular expression that matches some standard email address patterns:
Now, to access the list of emails you just need one final step, type the following in your browser console:
listOfEmails
You should see your list of emails! Well done!
Here’s the entire program we just wrote.
Final program for collecting all the email addresses on a webpage
var listOfEmails = [];
var contentToSearch = document.body.innerHTML;
var contentAsText = contentToSearch.toString();
listOfEmails = contentAsText.match(/([a-zA-Z0-9._-]+@[a-zA-Z0-9._-]+\.[a-zA-Z0-9._-]+)/gi);
console.log(listOfEmails);
Please don’t forget to run this code in your web browser’s developer console.
Collecting all the links on a webpage
This will be pretty similar to the program we wrote for collecting all the email addresses.
Please open this page in a new window beside this one, activate your developer console, and start by creating an array to store our links:
var listOfLinks = [];
Now let’s collect all the links on the page.
Lucky for us, there’s a default JavaScript method called .links which can collect all the links on a page for us, without the need for writing a custom function.
Let’s write a variable to use the .links method:
var collectLinks = document.links;
Now we’ll need to loop through the links one by one and add them to our array.
Let’s do this with a JavaScript loop which utilizes the .push method:
Did you see the number 12 in your developer console?
If you did, congratulations, you’ve just collected all of the links on the page.
Now let’s take a look at the content of our array by typing the following:
listOfLinks;
Notice it collected all the email addresses and links?
That’s perfectly normal since both email addresses and links use the HTML tag a href.
Well done!
Here’s the entire program we just wrote.
Final program for collecting all the links on a webpage
var listOfLinks = [];
var collectLinks = document.links;
for(var i=0; i<collectLinks.length; i++) {
  listOfLinks.push(collectLinks[i].href);
}
console.log(listOfLinks);
Please don’t forget to run this code in your web browser’s developer console.
Why this works
You might be wondering how this is possible, considering you don’t have the ability to edit the JavaScript files on a website you are visiting.
Well, you don’t actually need to edit a website’s JavaScript files directly as you can run the JavaScript program in your web browser’s developer console. This is actually one of JavaScript’s best features!
So, with only our web browser and a little bit of JavaScript know how we were able to collect all the email addresses and links on a webpage.
Pretty handy right?
Next, let’s learn how to add some intelligence to our programs with conditional statements which let our programs make decisions on their own.
Repeating yourself can be a hassle, but sometimes you’ve got to do it you’ve got to do it.
There’s nothing wrong with a bit of repetition. Many of the things we love are the byproduct of meticulously constructed repetition.
A recipe, for example, is a set of repeating steps. A song? The chorus is the best part! Sunrise and sunset? Both repeat! And who doesn’t love sunrises and sunsets!
Repeating statements in JavaScript are called loops, and loops are incredibly useful.
This guide will help you understand loops in the JavaScript language. Specifically, it will help you understand loop syntax and how to write and use the loops you create.
What is a JavaScript loop?
Imagine you wanted to purposefully repeat an action, for example, let’s say you wanted to count from 1 to 10.
There are a few ways you could do this in JavaScript.
Not only is typing out a statement ten times tedious, but it doesn’t count down in sequence.
Let’s look at a better way to repeat an action in JavaScript with loops!
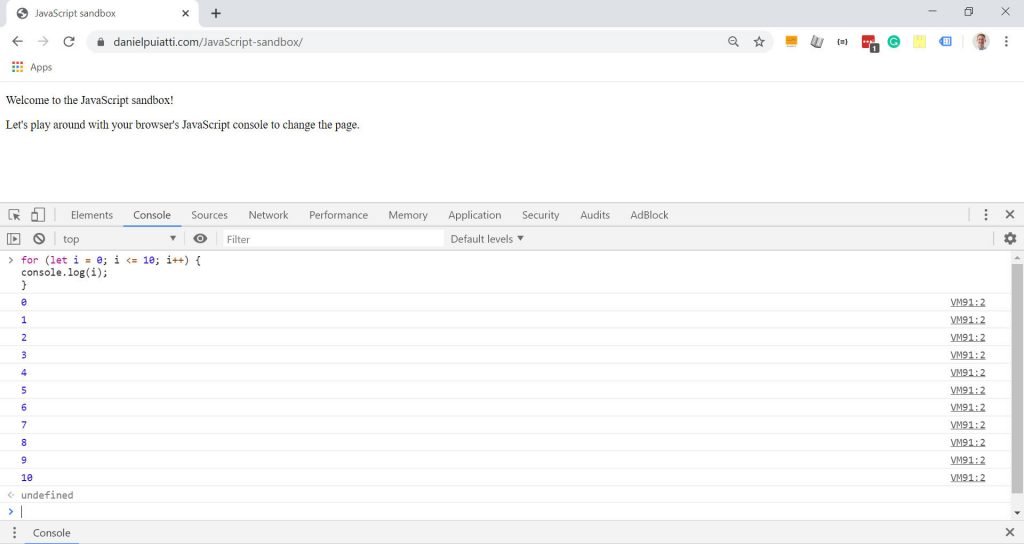
Using the original example above, let’s imagine we wanted to count from 1 to 10 in the JavaScript console.
Here’s what a JavaScript loop that does that would look like:
for (let i = 0; i <= 10; i++) {
console.log(i);
}
Try to run the loop above in your console. You should see something like this:
Pretty neat how JavaScript took care of all the repetition for you right?
You’ll be amazed at how many repetitive things you can automate with JavaScript.
Let’s start by taking a look at loop syntax.
JavaScript Loop syntax
Let’s disassemble the loop we used to count from 1 to 10 to better understand the loop syntax.
Here’s the loop:
for (let i = 0; i <= 10; i++) {
console.log(i);
}
There are a number of different types of loops, in this example, we’ll be using the for loop.
The for loop tells JavaScript to repeat an action according to the rules within the ().
Between the opening ( closing ) is where you write the rules which the for loop follows.
In the example above we’re telling JavaScript to repeat the loop 10 times. Let’s take a look at how the rules within the () tell the loop to do this.
There are three conditions within the () that provide instructions on how the loop should function.
The let i = 0; statement is the first condition called the initial expression. We use it to declare a starting point for the loop.
let i = 0 tells the loop where it should start. let i = 0 tells the loop to start at 0. You could start at any number below 10 for this example and the loop would count up from that number until it reaches 10.
i <= 10; statement is called a condition. The for loop refers to this condition every time it finishes running the statements withing the opening { and closing } (more on these below) to determine if it should continue to repeat the loop. In the for loop example above, the loop will repeat for as long as the i is less than or equal <= to 10.
i++; statement is called an increment expression. The for loop looks at the increment expression each time the loop runs. The increment expression tells JavaScript to increment the variable i by 1 each time the loop runs.
The statements within the { and closing } will be executed each time the loop runs.
console.log(i) will log the i value each time the loop runs and the i value will increment by one each time the loop runs.
Looping through items in an array
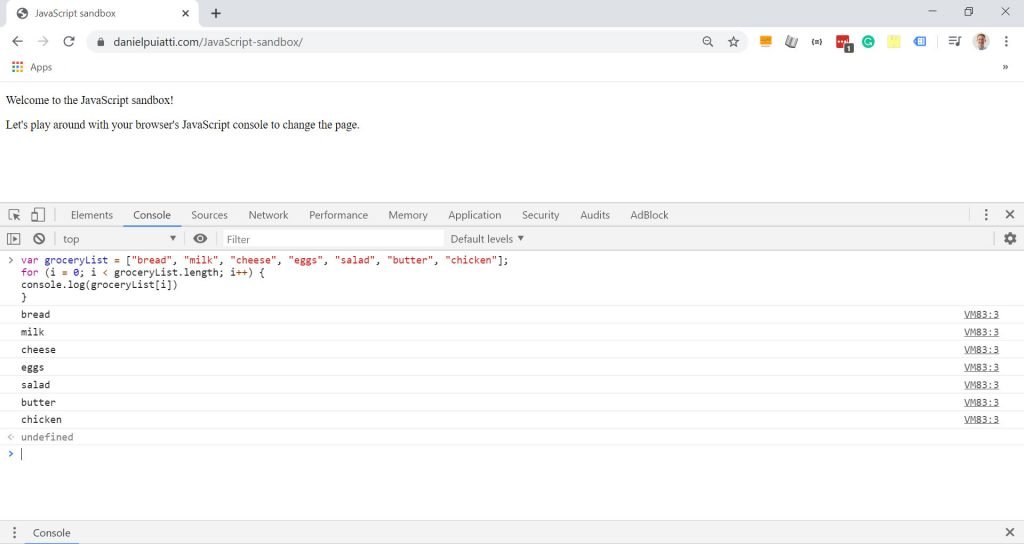
Let’s try using the loop with a more practical example. We’ll loop through a list of grocery items in our console.
Now let’s use a loop to cycle through each item and display them in the console.
After declaring your groceryList array type the following:
for (i = 0; i < groceryList.length; i++) {
console.log(groceryList[i]);
}
You should see something like this:
You’ll notice that the loop condition was slightly different than the one we used to count from 10 to 1. Specifically, instead of i = <10 we used i < groceryList.length.
i < groceryList.length tells the loop to repeat for as long as i is less than the length of the groceryList array.
Using the .length property on an array returns the total number of items in the array.
So, the for loop condition i < groceryList.length will count the total number of items in the array and repeat the loop for each item in the array.
console.log(groceryList[i]) will display each item in the array in your console.
If you recall my guide on JavaScript arrays, you’ll remember that each item in an array has a numerical position.
For example, the groceryList array we created will have 6 numerical positions for each item in the array.
Position 0 is “bread”, position 1 is “milk”, position 2 is “cheese”, position 3 is “eggs”, positon 4 is “salad”, position 5 is “butter”, position 6 is “chicken”.
You’ll also recall that you can access each item in the array in the JavaScript console by typing the array name followed by the numerical position.
So, if I wanted to access eggs I’d type the following in my console: groceryList[3]
With console.log(groceryList[i]) we used [i] instead of a numerical position.
This allows the for loop to substitute the i with the numerical position of each item in the array, which it then logs to the console and then increments by one (remember this is what the i++ does).
Getting all the links on a page with JavaScript
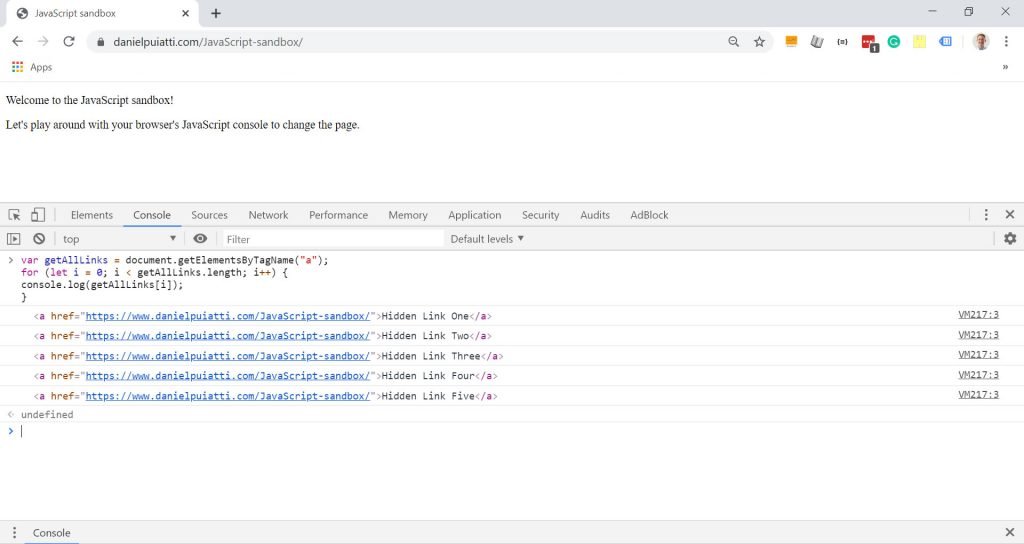
Let’s try another practical example that you might find useful. We’re going to JavaScript to loop through all the links on a page.
Begin by opening up this page in a new browser window and placing it beside this window with the JavaScript console open.
Type the following in your console:
var getAllLinks = document.getElementsByTagName("a");
for (let i = 0; i < getAllLinks.length; i++) {
console.log(getAllLinks[i]);
}
You should see something like this:
You’ll notice the console uncovered five hidden links on the page. Let’s examine the JavaScript code we ran to understand how a loop allowed us to uncover these links.
Here’s the code again:
var getAllLinks = document.getElementsByTagName("a");
for (let i = 0; i < getAllLinks.length; i++) {
console.log(getAllLinks[i]);
}
document.getElementsByTagName("a"); is a method which will find all HTML tags specified within the (). In this instance, we’ve asked JavaScript to find every a tag, otherwise known as a link. The method returns an array with every link it finds. We assigned this method to the variable getAllLinks.
Next, we set up a for loop that has:
An initial expression of let i = 0;.
A condition of i < getAllLinks.length;.
And an increment expression of i++.
Finally, we logged each item in the getAllLinks array to the console with console.log(getAllLinks[i]);.
Pretty handy right? I definitely think so.
Whether you need to collect a bunch of email addresses from a web page, cycle through a newsfeed or even count down from 10 to 1, loops are an essential tool for any JavaScript developer who needs to repeat something, who needs to repeat something.